All About Cisco Multicast MOH Configuration

Agenda

  • Overview
  • Configuration Check
  • Troubleshooting & Common Problems

Overview

1

Configuration Check

Make sure that you have the IP Voice Media Streaming App turned “On” in order for your server to start streaming the Multicast packets outbound toward the gateway.

2

Make sure that you have your MOH file loaded in to each and every CUCM server that you are using in the cluster. This is a bit counterintuitive because you think you are configuring the server to play the MOH file that you are loading. Instead we do this simply to be able to select the MOH file to play whenever the phone is configured.

Here we verify how long our MOH file is as well as verifying its “In Use”

3

This page allows us to make the configuration change for Multicasting as well as verify what codecs are supported with the stream that you’ve installed.

4

This page shows us how many MOH servers we can configure as well as where exactly they are registered to. Many times customers don’t know that these must show up as “Registered with …” in order to work properly. Be sure to check this and then reset these as needed.

5

MRG setup as well as the Multicast checkbox that you must enable.

6

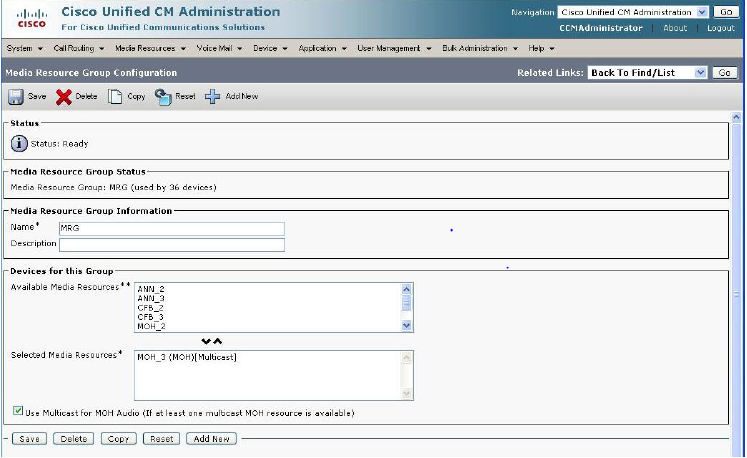
MRGL setup that allows us to place our MRG inside the selected resource groups in order for us to be able to access our MOH server and file correctly.

7

This is the phone configuration page and the locations that you must configure if you want to access an MOH server/file. You don’t need an MRGL here if its taken care of on the Device Pool.

8

This is the line configuration page and the locations that you could possibly configure if you want to access an MOH

9

This is the Device Pool where I’ve configured an MRGL (optional), but only if its not taken care of at the Phone Configuration page.

10

This is the MOH server configuration where I enable Multicasting and then define how I will configure the multicast IP on the gateway as well as the port number.

11

This is the chart that shows you how the IP’s and ports change depending on the previous Slides configuration.

12

This is the gateway configuration that I’ve done, and you see where I’ve added the “Pim sparse-dense-mode” command that is needed.

13

Below is the configuration setup for multicast routing that you must enable throughout the entire network.

14

You will need to place this command on the gateway in order for the MOH to begin streaming outbound from the gateway to the PSTN/Outbound Interfaces as desired.

15

Troubleshooting &Common Problems Common Problems

  • I hear TOH (Tone-On-Hold) and not able to hear my MOH file that I expect
  • Verify Audio Source and Multicast Flag are set correctly on the traces, if they are then this is most likely a gateway issue.
  • I just hear silence and my file isn’t playing
  • Verify Audio Source and Multicast Flag are set correctly on the traces, if they are then this is most likely a gateway issue.
  • Verify Regions and Codecs being used, if H.323 remember that Dial-Peer 0 uses G.729 automatically so be sure to specify the correct codec if needed.

Below is the command that you can run from the gateway that will show you the MOH file that is configured to play which must match up to the file that is expected to be streaming. You can also see the Multicast IP address involved with the command listed. The 192.168.2.1 IP address is the Loopback address. You can use either the loopback or a physical interface for your setup.

16

This is the command that you run from the SSH session on the CUCM servers. The Following command will spit the output of the Multicast MOH servers that are configured and what their port/IP address is. We are incrementing on the IP address for my setup which means that the IP addresses will Increment here as well. For each different IP address you involve a different codec negotiated.

17

The following command will be input on the MOH gateway that we’ve involved. The output of this command will display the active MOH sessions on that particular GW as desired. From this command we can see the Multicast IP address, RTP Port, Packet count (which should be incrementing), call ID, Codec negotiated, and Incoming interface being used

18

The command ran on the gateway here is “debug MGCP Packets”and from that output we can see where the multicast IP address is detected and then used to stream all relative information as needed.

19

20


21


22

Troubleshooting

  • Verify through the CUCM traces first that you have your AudioSource ID and Multicast Flag enabled.
  • Proceed to the gateway, verify the codec information and gateway configuration commands are set correctly. If you are receiving silence try using another file you’ve verified to work or speak with the MS team.
  • Traces to obtain:CM traces set to “Detailed” and pull after making a test callI PVMS traces set to detailed to confirm that its working correctly Debug MGCP packets (if MGCP)Debug voip CCAPI inout Show ccm-manager music-on-hold (whenever you enable the call)

#moh-server, #multicast-ip-address, #multicast-moh

How to take Cisco Unity Connection Express backup

Configuring the Backup Server

Before you begin the backup process from the Administration Backup/Restore Start Backup window, you must first set the parameters in this window.

Use this procedure to configure the backup server.

  1. Choose Administration > Backup/Restore > Configuration.
  2. Enter the information shown in the following fields:
  3. Server URL—The URL of the server on the network where backup files are stored. The format should be ftp://server/directory/ where server is the IP address or hostname of the server.
  4. User ID—The account name or user ID on the backup server. You must have an account on the system to which you are backing up your data. Do not use an anonymous user ID.
  5. Password—The password for the account name or user ID on the backup server.
  6. Confirm Password—The password entered again.
  7. Maximum Revisions—The maximum number of revisions of the backup data that you want to keep on the server. The maximum number is 50. The default value is 5.
  8. Click Apply to save the information.

Starting a Backup

You must do the following before starting a backup:

  • Configure the server used to back up the data. See Configuring the Backup Server.
  • Save your configuration. See Saving or Reloading Your Configuration.

Caution : Performing a backup for the system data and configuration requires taking the system offline. Active voice-mail calls at that time are dropped, and callers reaching voice mail during the backup receive a message that the voice-mail system is unavailable. Active calls to the autoattendant are not dropped and the autoattendant continues to receive and process calls during the backup.

Use this procedure to begin the data backup process.

  1. Click Administration > Backup/Restore > Start Backup. The Start Backup window appears and the system automatically generates a backup ID. The backup ID number increases by 1 every time you back up the server.
  2. Enter a description of the backup file; for example, “backupdata6-2-04.”
  3. Select the category of backup, or type of data that you want to save:
  4. Configuration—Saves the configurations of the system and applications.
  5. Data—Saves your voice-mail messages.
  6. Historical Reporting Data—Saves your historical reporting information.
  7. Click Start Backup.

#ccie-voice, #unity

Cisco UCM User Licensing

Bsoft Bangalore

Agenda 

  • UCM Licensing High Level design
  • Phone classification (a subset)
  • License Tier classification
  • Screen shots of the Licensing UI pages
  • Troubleshooting tips
  • Feature documentation

UCM Licensing High Level Design

Picture1

Phone Classification

  • Tin: analog, Cisco 3905, Cisco VGC phone, Cisco VGC Virtual phone
  • Copper: Cisco 6901, Cisco 6911, Cisco 6921, CUC-RTX
  • Bronze: Most phones
  • Silver: Cisco IP Communicator, Cisco IP Personal Communicator, IMS integrated mobile, Unified Client Services Framework
  • Gold: Cisco Dual Mode for Android, Cisco Dual Mode for iPhone, Cisco Unified Mobile Communicator,
  • Telepresence: Carrier-Integrated Mobile

License Tiers

EssentialBasicEnhancedStandardPremiumProfessionalTelepresence
Features
EMYYYYYY
SNRYYYYY
Phones (number)11126101
Phone Type
TinYYYYYY
CopperYYYYY
BronzeYYYY
SilverYYY
GoldYY
Tele-presenceY

Licensing States on UCM

View original post 466 more words

Cisco UCM User Licensing

Agenda 

  • UCM Licensing High Level design
  • Phone classification (a subset)
  • License Tier classification
  • Screen shots of the Licensing UI pages
  • Troubleshooting tips
  • Feature documentation

UCM Licensing High Level Design

Picture1

Phone Classification

  • Tin: analog, Cisco 3905, Cisco VGC phone, Cisco VGC Virtual phone
  • Copper: Cisco 6901, Cisco 6911, Cisco 6921, CUC-RTX
  • Bronze: Most phones
  • Silver: Cisco IP Communicator, Cisco IP Personal Communicator, IMS integrated mobile, Unified Client Services Framework
  • Gold: Cisco Dual Mode for Android, Cisco Dual Mode for iPhone, Cisco Unified Mobile Communicator,
  • Telepresence: Carrier-Integrated Mobile

License Tiers

Essential Basic Enhanced Standard Premium Professional Telepresence
Features
EM Y Y Y Y Y Y
SNR Y Y Y Y Y
Phones (number) 1 1 1 2 6 10 1
Phone Type
Tin Y Y Y Y Y Y
Copper Y Y Y Y Y
Bronze Y Y Y Y
Silver Y Y Y
Gold Y Y
Tele-presence Y

Licensing States on UCM

Demo

Warning displayed : The system is operating on demo licenses that will expire in <X> days. Add this system to an Enterprise License Manager and install sufficient licenses to cover its usage before expiration in order to avoid losing the ability to provision users and devices.

No Provisioning

Warning displayed : The system is operating without any valid licenses. Configure licenses on the system in order to restore the ability to provision users and devices.

Overage:

Warning displayed : The system is operating with an insufficient number of licenses. If additional licenses to cover the shortage are not configured in your Enterprise License Manager within <X> days, you will no longer be able to provision users and devices.

Lost connection to ELM

Warning displayed: The system has not synchronized successfully with Enterprise License Manager for <X> days. If successful synchronization does not occur within the next <60-X> days, you will no longer be able to provision users and devices.

Security mismatch with ELM

Warning displayed: Due to a certificate mismatch, the system has not synchronized successfully with Enterprise License Manager for <X> days. If successful synchronization does not occur within the next <60-X> days, you will no longer be unable to provision users and devices.

Grace

Warning displayed: The system is operating under a licensing grace period that will expire in 1 day. Install sufficient licenses in the Enterprise License Manager for this system to cover its usage in order to avoid losing the ability to provision users and devices. If licenses for this system are not already being managed by an Enterprise License Manager server, the system must first be added to one.

Warnings on Landing Page

1

Licensing UI 

License Usage Report (System -> Licensing->License Usage Report)

A high level view of all the license usage on the UCM cluster.

User details (System -> Licensing->License Usage Report -> Users)

Details regarding users and features enabled with respect to licensing.

Device details for each user: (System -> Licensing->License Usage Report -> Users -> View Details)

Details regarding the devices associated with each user.

Unassigned device details (System -> Licensing->License Usage Report -> Unassigned devices)

Details regarding devices provisioned which have not been associated with any user.

License Usage Report (System->Licensing)

2

User Details

3

Device details for each user

4

Unassigned device details

5

Troubleshooting tips

  • License Manager logs are located at

/var/log/active/cm/trace/userlicensing/log4j

  • Product servlet logs are located at

/usr/local/thirdparty/apache-tomcat-7.0.20/logs/elm-client/log4j

  • Certificates used to validate communications with the ELM

/usr/local/platform/.security/userlicensing/trust_certs

Cisco_Root_CA_M1.pem (default) , ELM.pem and SubCa.pem (after ELM registration)

These certificates can be viewed from OS Admin->Security->Certificate Management

  • License Manager alarms can be seen in Syslog and through RTMT. An example of an alarm in Syslog:

Dec 7 16:00:07 vos-cm34 local7 3 : 0: vos-cm34.cisco.com: Dec 08 2011 00:00:07.803 UTC : %UC_JAVAAPPLICATIONS-3-CiscoElmNotConnected: %[Reason=CiscoElmNotConnected][AppID=Cisco License Manager][ClusterID=][NodeID=vos-cm34]: Enterprise License Manager Not Connected

#licensing